在上一篇博客文章中,我们为你展示了 elk — 一个为 Ent 设计的扩展,能够让你根据 schema 生成完善的 Go CRUD HTTP API。今天,我想向你介绍一个刚刚加入 elk 的闪亮新功能:一个完全符合规范的 OpenAPI Specification (OAS) 生成器。
OAS(以前称为 Swagger 规范)是一种技术规范,用来定义 REST API 的标准、与语言无关的接口描述。这样,既可以让人类,也可以让自动化工具在没有源码或额外文档的情况下理解所描述的服务。结合 Swagger Tooling,你只需传入 OAS 文件,就能为 20 多种语言生成服务器和客户端样板代码。
Getting Started
第一步是将 elk 包添加到你的项目中:
go get github.com/masseelch/elk@latest
elk 使用 Ent 的 Extension API 与 Ent 的代码生成集成。这要求我们使用 entc(ent 代码生成)包,如同 这里 所述,来为我们的项目生成代码。按照接下来的两步来启用它,并配置 Ent 以配合 elk 扩展:
1. 创建一个名为 ent/entc.go 的 Go 文件,并粘贴以下内容:
// +build ignore

package main

import (
    "log"

    "entgo.io/ent/entc"
    "entgo.io/ent/entc/gen"
    "github.com/masseelch/elk"
)

func main() {
    ex, err := elk.NewExtension(
        elk.GenerateSpec("openapi.json"),
    )
    if err != nil {
        log.Fatalf("创建 elk 扩展失败: %v", err)
    }
    err = entc.Generate("./schema", &gen.Config{}, entc.Extensions(ex))
    if err != nil {
        log.Fatalf("运行 ent 代码生成失败: %v", err)
    }
}
2. 编辑 ent/generate.go 文件,以执行 ent/entc.go:
package ent

//go:generate go run -mod=mod entc.go
完成上述步骤后,你就可以从 schema 生成 OAS 文件了!如果你是 Ent 新手,想了解如何连接不同类型的数据库、运行迁移或处理实体,请查看 Setup Tutorial。
Generate an OAS file
我们生成 OAS 文件的第一步是创建一个 Ent schema 图:
go run -mod=mod entgo.io/ent/cmd/ent new Fridge Compartment Item
为演示 elk 的 OAS 生成能力,我们将共同构建一个示例应用程序。假设我有多台冰箱,里面有多个隔层,我和我的另一半想随时了解其中的内容。为此,我们将创建一个具备 RESTful API 的 Go 服务器。为了简化与服务器通信的客户端应用程序的开发,我们将创建一份描述其 API 的 OpenAPI 规范文件。获取到文件后,你可以使用 Swagger Codegen 为你选择的语言构建前端来管理冰箱和内容!你可以在此处找到利用 Docker 生成客户端的示例。
让我们来创建 schema:
package schema

import (
    "entgo.io/ent"
    "entgo.io/ent/schema/edge"
    "entgo.io/ent/schema/field"
)

// Fridge holds the schema definition for the Fridge entity.
type Fridge struct {
    ent.Schema
}

// Fields of the Fridge.
func (Fridge) Fields() []ent.Field {
    return []ent.Field{
        field.String("title"),
    }
}

// Edges of the Fridge.
func (Fridge) Edges() []ent.Edge {
    return []ent.Edge{
        edge.To("compartments", Compartment.Type),
    }
}
package schema

import (
    "entgo.io/ent"
    "entgo.io/ent/schema/edge"
    "entgo.io/ent/schema/field"
)

// Compartment holds the schema definition for the Compartment entity.
type Compartment struct {
    ent.Schema
}

// Fields of the Compartment.
func (Compartment) Fields() []ent.Field {
    return []ent.Field{
        field.String("name"),
    }
}

// Edges of the Compartment.
func (Compartment) Edges() []ent.Edge {
    return []ent.Edge{
        edge.From("fridge", Fridge.Type).
            Ref("compartments").
            Unique(),
        edge.To("contents", Item.Type),
    }
}
package schema

import (
    "entgo.io/ent"
    "entgo.io/ent/schema/edge"
    "entgo.io/ent/schema/field"
)

// Item holds the schema definition for the Item entity.
type Item struct {
    ent.Schema
}

// Fields of the Item.
func (Item) Fields() []ent.Field {
    return []ent.Field{
        field.String("name"),
    }
}

// Edges of the Item.
func (Item) Edges() []ent.Edge {
    return []ent.Edge{
        edge.From("compartment", Compartment.Type).
            Ref("contents").
            Unique(),
    }
}
现在,生成 Ent 代码和 OAS 文件:
go generate ./...
除了 Ent 通常生成的文件,系统还会生成一个名为 openapi.json 的文件。你可以将其内容复制粘贴到 Swagger Editor 中。你会看到三个组:Compartment、Item 和 Fridge。
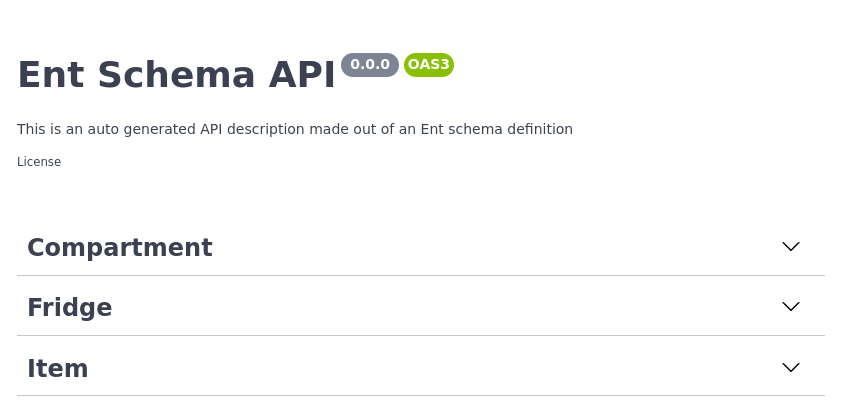
Swagger Editor 示例
如果你打开 Fridge 组的 POST 操作标签页,你会看到预期请求数据的描述以及所有可能的响应。不错!

Fridge 的 POST 操作
Basic Configuration
我们的 API 描述尚未反映它的真正功能,让我们进行修改吧!elk 提供了易于使用的配置构造器,用于操作生成的 OAS 文件。打开 ent/entc.go 并传入更新后的标题和描述:
//go:build ignore
// +build ignore

package main

import (
    "log"

    "entgo.io/ent/entc"
    "entgo.io/ent/entc/gen"
    "github.com/masseelch/elk"
)

func main() {
    ex, err := elk.NewExtension(
        elk.GenerateSpec(
            "openapi.json",
            // It is a Content-Management-System ...
            elk.SpecTitle("Fridge CMS"),
            // You can use CommonMark syntax (https://commonmark.org/).
            elk.SpecDescription("API 用于管理冰箱及其冷藏内容。**ICY!**"),
            elk.SpecVersion("0.0.1"),
        ),
    )
    if err != nil {
        log.Fatalf("创建 elk 扩展失败: %v", err)
    }
    err = entc.Generate("./schema", &gen.Config{}, entc.Extensions(ex))
    if err != nil {
        log.Fatalf("运行 ent 代码生成失败: %v", err)
    }
}
再次运行代码生成器,即可得到更新后的 OAS,你可以将其复制粘贴到 Swagger Editor。
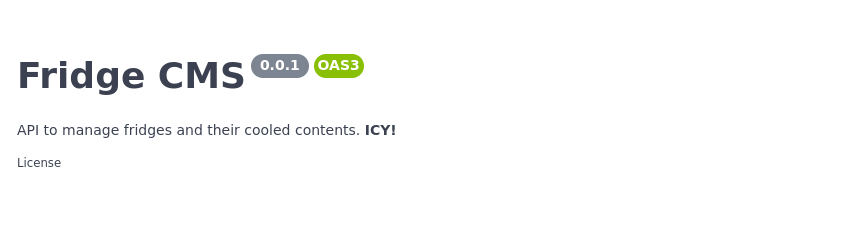
更新后的 API 信息
Operation configuration
我们不想公开删除冰箱的端点(说真的,谁会想要那?)。好在 elk 允许我们配置哪些端点生成,哪些忽略。elk 的默认策略是公开所有路由。你可以将此行为改为不公开任何路由,除非你显式请求,或仅使用 elk.SchemaAnnotation 排除 Fridge 的 DELETE 操作:
// Fridge 的注解。
func (Fridge) Annotations() []schema.Annotation {
    return []schema.Annotation{
        elk.DeletePolicy(elk.Exclude),
    }
}
效果立现!DELETE 操作消失了。

DELETE 操作已消失
欲了解更多关于 elk 策略如何工作以及你可以做什么的信息,请查看 godoc。
Extend specification
在这个示例中,我最关心的是冰箱当前的内容。你可以通过使用 Hooks 将生成的 OAS 自定义到任意规格。然而,这超出了本文范围。如何向生成的 OAS 文件添加一个 fridges/{id}/contents 端点的示例可以在此处找到。
Generating an OAS-implementing server
我承诺在开始时会创建一个按照 OAS 描述行为的服务器。elk 让这件事变得简单,只需在配置扩展时调用 elk.GenerateHandlers():
[...]
func main() {
    ex, err := elk.NewExtension(
        elk.GenerateSpec(
            [...]
        ),
+       elk.GenerateHandlers(),
    )
    [...]
}
接下来重新运行代码生成:
go generate ./...
你会发现生成了一个名为 ent/http 的新目录。
» tree ent/http
ent/http
├── create.go
├── delete.go
├── easyjson.go
├── handler.go
├── list.go
├── read.go
├── relations.go
├── request.go
├── response.go
└── update.go

0 directories, 10 files
你可以使用以下极简的 main.go 启动生成的服务器:
package main

import (
    "context"
    "log"
    "net/http"

    "<your-project>/ent"
    elk "<your-project>/ent/http"

    _ "github.com/mattn/go-sqlite3"
    "go.uber.org/zap"
)

func main() {
    // 创建 ent 客户端。
    c, err := ent.Open("sqlite3", "file:ent?mode=memory&cache=shared&_fk=1")
    if err != nil {
        log.Fatalf("打开 sqlite 连接失败: %v", err)
    }
    defer c.Close()
    // 运行自动迁移工具。
    if err := c.Schema.Create(context.Background()); err != nil {
        log.Fatalf("创建 schema 资源失败: %v", err)
    }
    // 启动监听传入请求。
    if err := http.ListenAndServe(":8080", elk.NewHandler(c, zap.NewExample())); err != nil {
        log.Fatal(err)
    }
}
go run -mod=mod main.go
我们的 Fridge API 服务器已经启动。利用生成的 OAS 文件和 Swagger Tooling,你现在可以为任何受支持的语言生成客户端桩,并彻底抛弃手写 RESTful 客户端的需求。
Wrapping Up
本文介绍了 elk 的新功能 —— 自动 OpenAPI 规范生成。该功能将 Ent 的代码生成能力与 OpenAPI/Swagger 的丰富工具生态系统连接在一起。
有问题?需要帮助入门?欢迎加入我们的 Discord 服务器 或 Slack 频道。
- 订阅我们的 Newsletter
- 在 Twitter 上关注我们
- 在 Gophers Slack 的 #ent 频道加入我们
- 加入我们的 Ent Discord 服务器